KIBI.ONE PRESENTS…
A Beginner’s Guide to Using Insomnia For API Testing
In this tutorial you’ll learn how to use Insomnia, a platform dedicated to helping developers build, test and debug their APIs.

Kibi.One is a no-code SaaS incubation program focused on helping non-technical founders build software companies. Visit our homepage to learn more about our program.
Learn How to Use Insomnia in About 10 minutes
In the previous tutorial, I taught you about JSON files and APIs. In this tutorial, I want to continue that conversation by diving deeper into the world of API testing. I’ve created a video for you watch below, or you can view the step by step API testing blog post below the vdieo.
Why Use API Testing Software?
Sometimes you’ll find an API but rather than injecting it into your application right away, you might want to play around with it to better understand how it works. Many people use Postman for this task. However, there are other API testing tools on the market. Insomnia is one of my favorites. Insomnia is a tool that you can sign up to for free and use to design, test and debug APIs. So let’s jump in.
First, after downloading insomnia and opening it up on your computer, you’ll see this option to “add new HTTP request”. Select that button.
Notice in the sidebar that we have a new GET request generated for us.
Finding Free (No Auth) APIs to Use
Now we need an API to test within Insomnia, so head over to Kib.one. We have a page on our site where we’ve listed our 10 favorite APIs that don’t require any authentication. This allows you to start drilling into data without having to register for an account anywhere.
In this tutorial, I’m going to use this quote API, but feel free to grab whatever API you want from our site.
API endpoint: https://quote-garden.onrender.com/api/v3/quotes
Sending API GET Requests
The very first thing I’ll do is I’ll paste this URL into this input field to the right of GET and then I’ll select “send”. This will now fetch the API data, which will show up, in JSON format, over to the right.
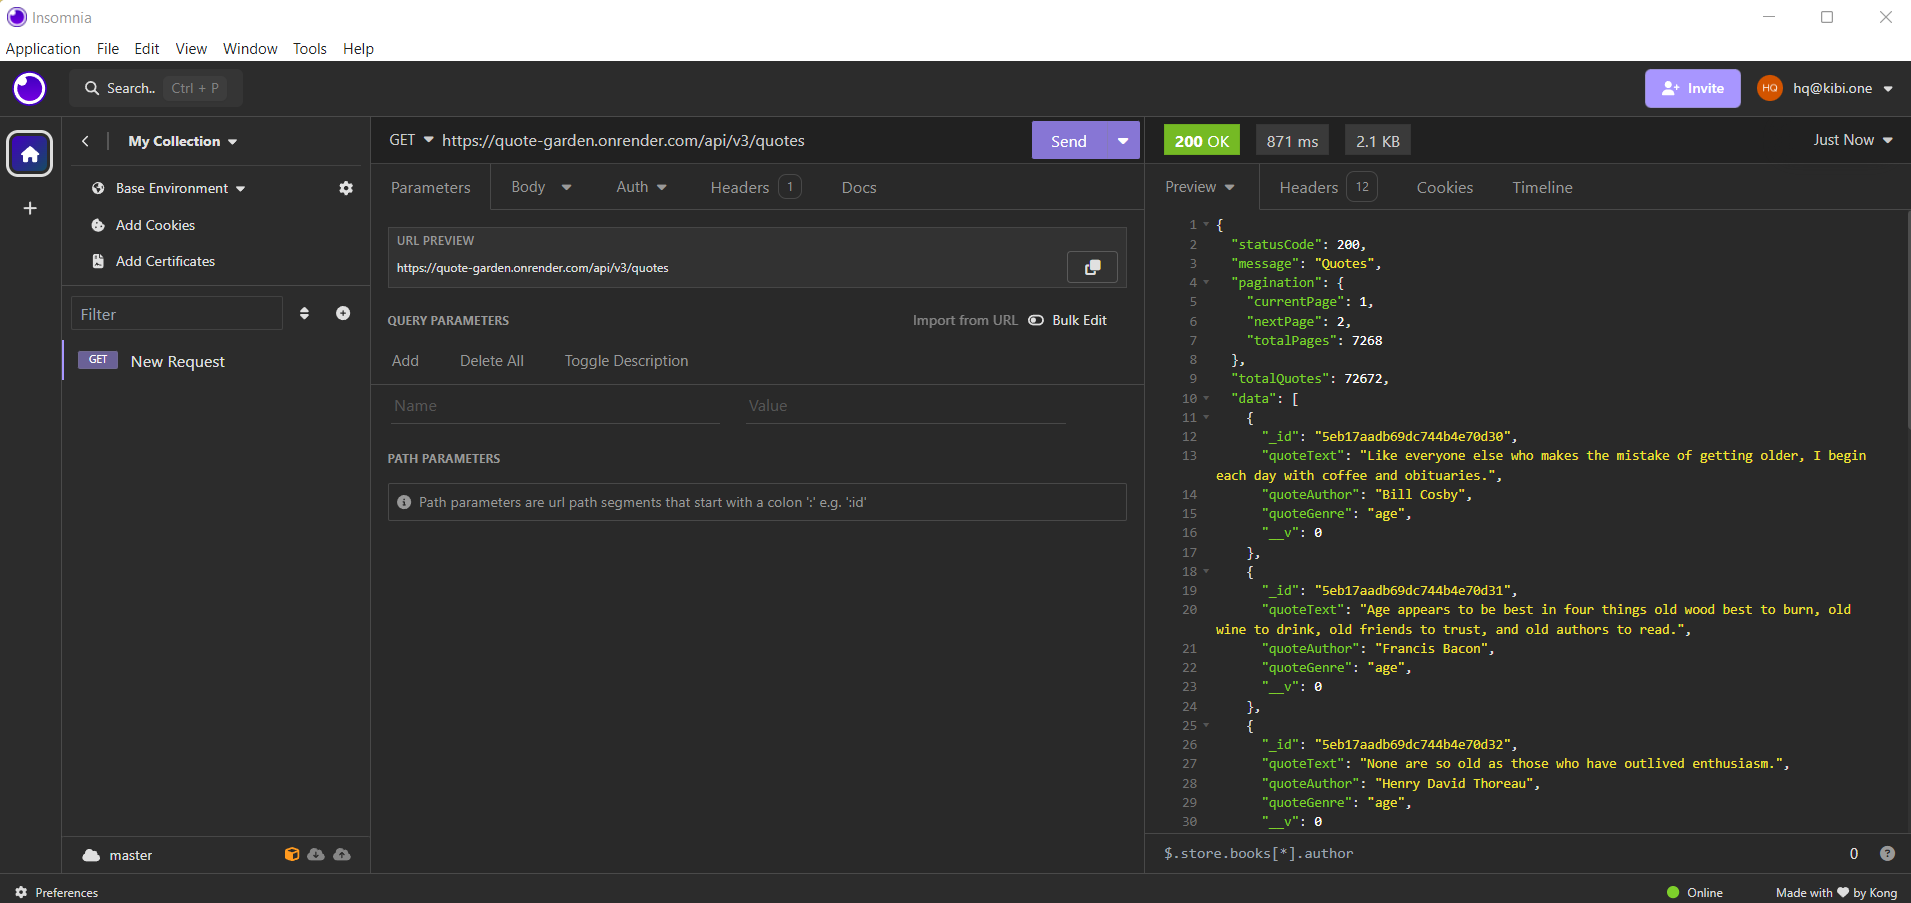
Essentially, in the middle panel is where you’ll do your API work and over to the right, is where you’ll see your API responses.
Notice in the image above, for example, you’ll see the status of the request just above the response as well as the time that the request took to complete.
Within Insomnia you might have many APIs that you’re working with, so you can add them all in the left sidebar. Currently, I just have this API called “new request”. In order to stay organized, you can change the name to whatever you want. I’ll change my APIs name to “Quote Garden”.
Next, let’s go back to Kibi.one and grab another no auth API endpoint. I’ll grab the space devs API.
API endpoint: https://ll.thespacedevs.com/2.2.0/agencies/?limit=10
Working with Multiple APIs
Back in insomnia, rather than deleting the Quote Garden API that I was previously working with, I can simply add a new API. Look at the image above and notice just to the right of “filter”, there is small + icon. Click that and then select “HTTP request”. I can now add the space devs API endpoint into Insomnia and then click on “send”. Now it’s easy for me to toggle back and forth between my work on these two APIs.
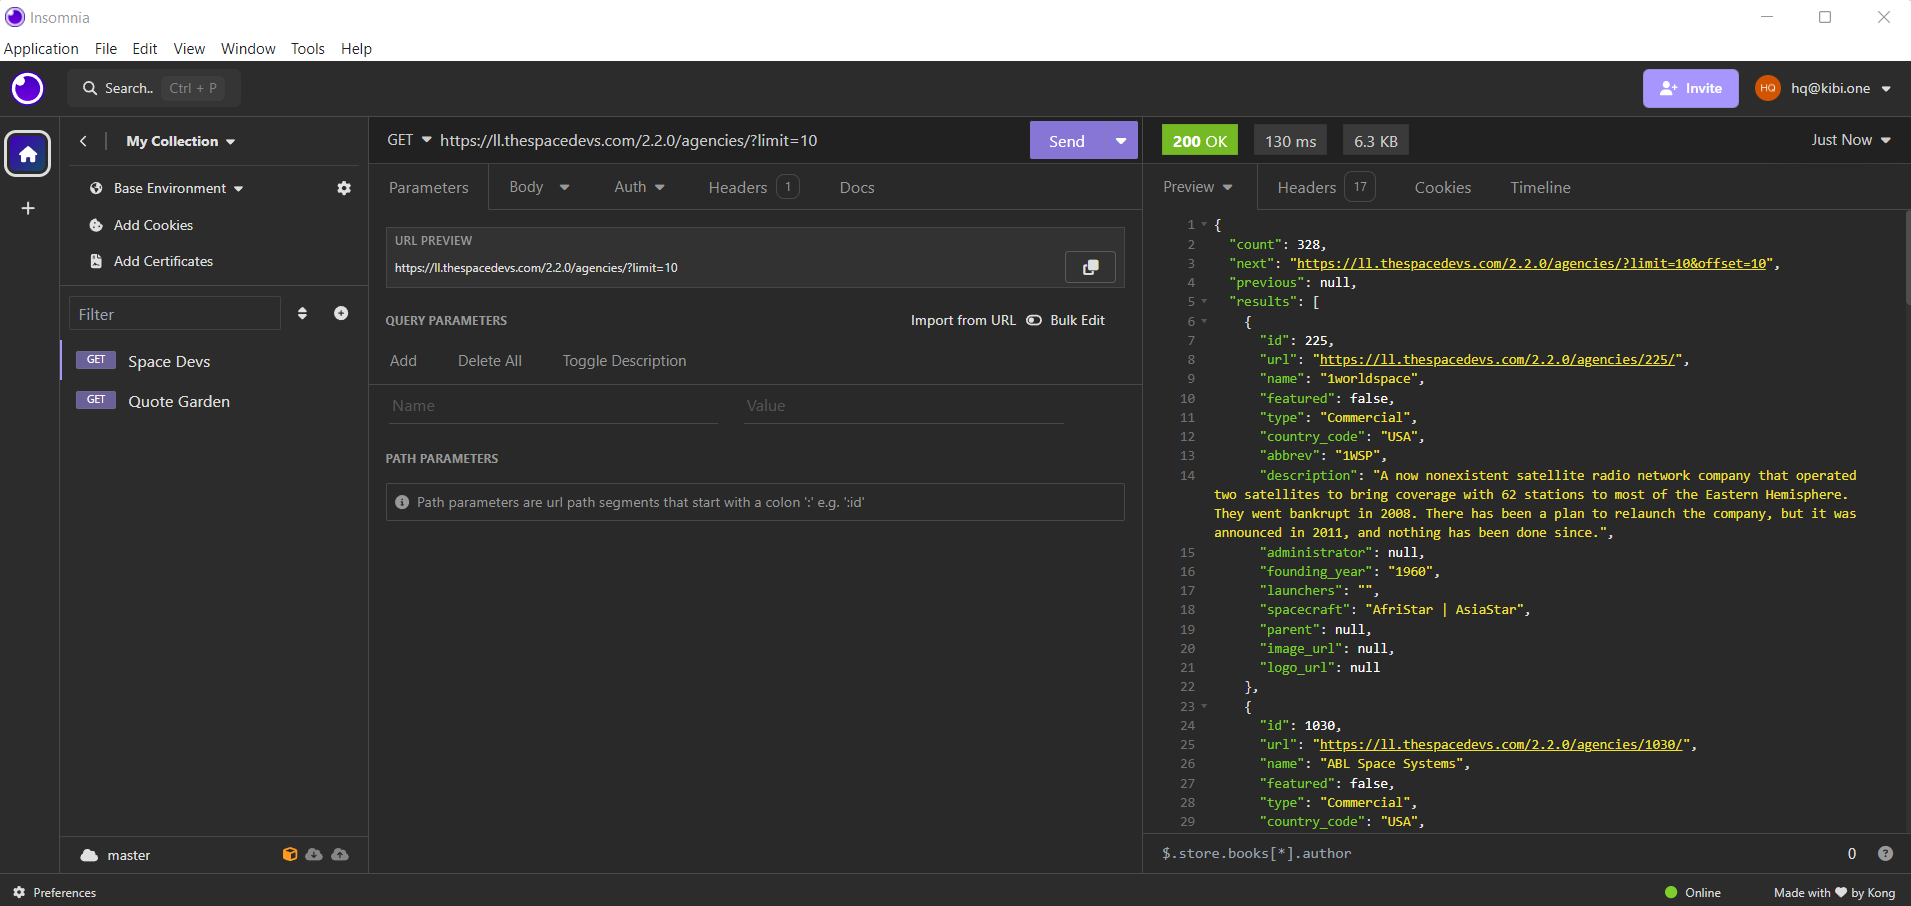
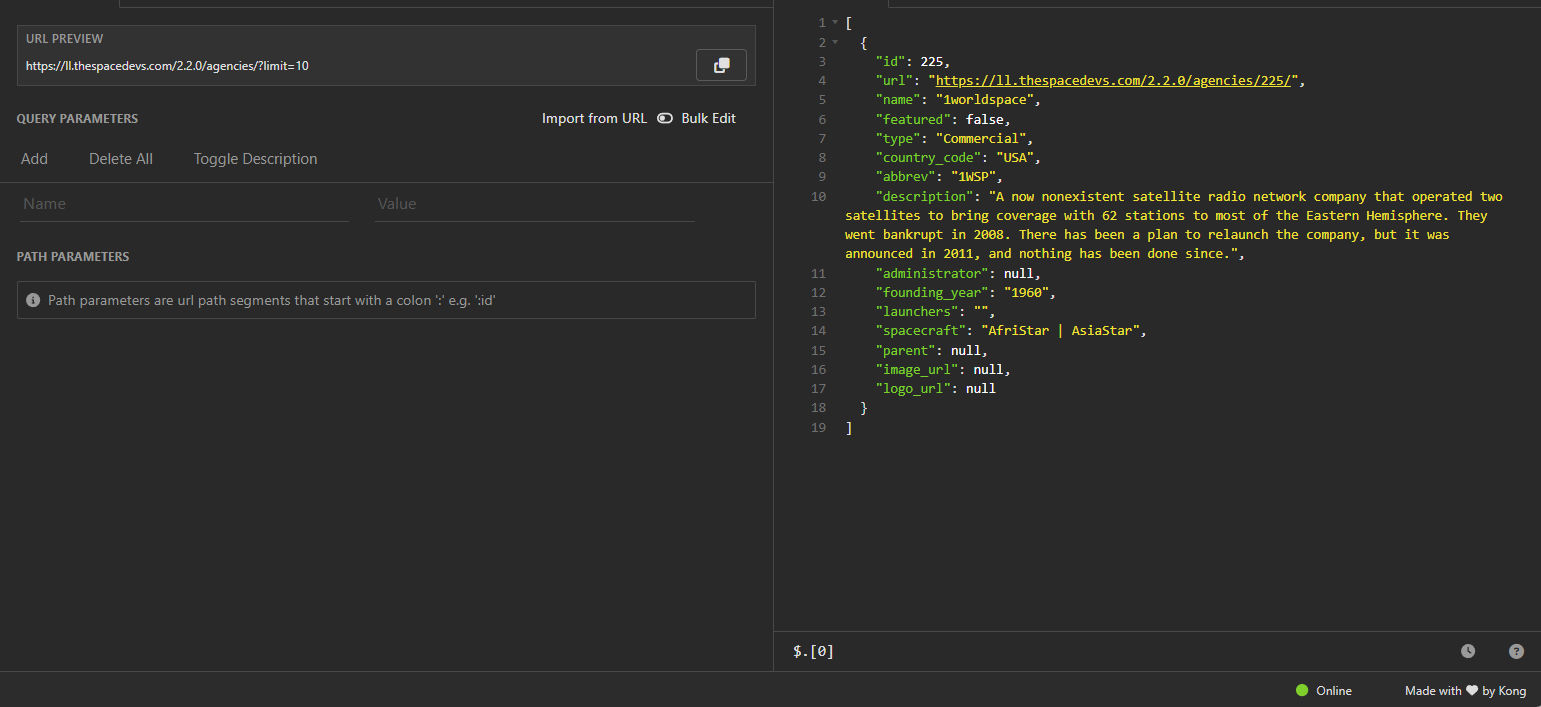
Let’s look at the space devs JSON data structure in a bit more detail. First, notice that we have a count of over 300 entries. Also, notice that the entries themselves are held in an array under the “key” “results”. Each entry is fairly short with an id, URL, name, description and so on. You’ll notice that each individual entry is held between curly braces. Imagine you only wanted to get the data from the first entry within this array. Notice that it has an ID of 225.
API Parameters
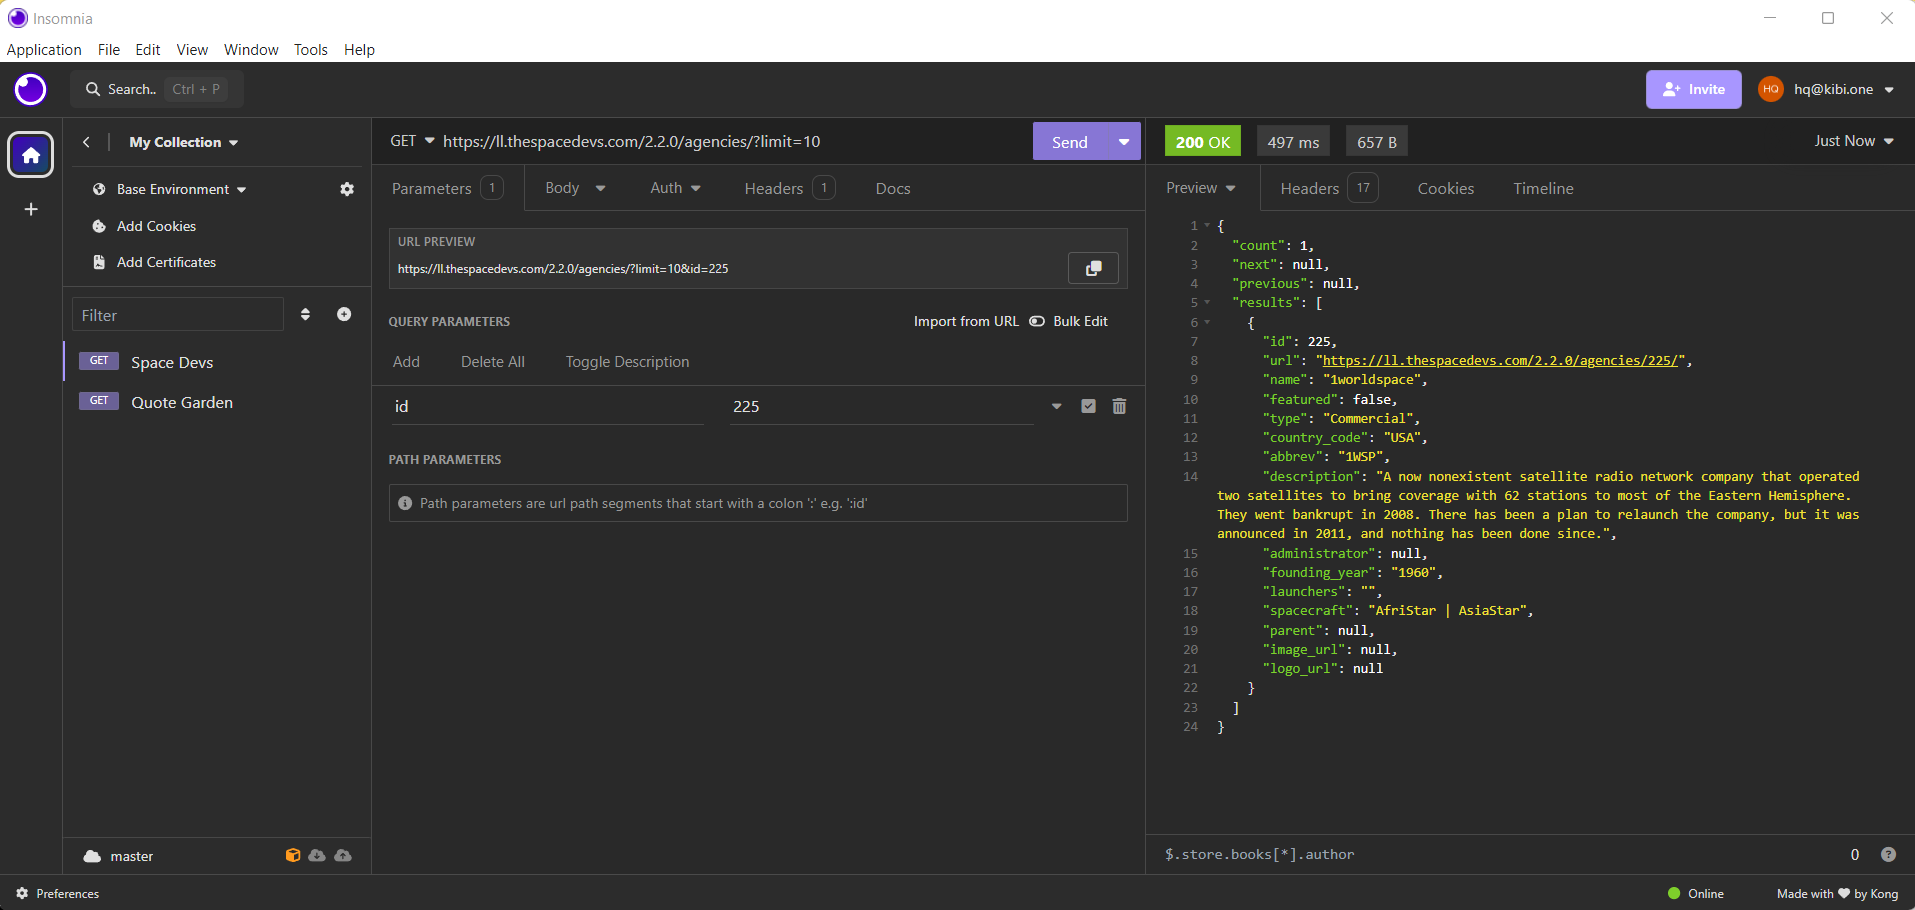
Within Insomnia, I could simply click on “Parameters”, I could add a parameter and under name I’ll put “ID” and under value I could type “225”. Now, when I click on send again, I’ll only get this single response back.
Let’s delete that parameter for now. Now let’s imagine we wanted to pull in only listings that have “USA” as their country code. For that, we’ll add a new parameter and we’ll type in “country code” under “name” and “USA” under “value”. Now, you’ll see only items that match our query parameters show up over in the response.
JSONPath Expression
There is also another way to filter results within Insomnia using JSONPath expressions. Which you can use down here in the lower right corner of the page. Again, let’s access this item which has the ID of 225, but rather than using query parameters, let’s use a JSONPath expression.
Remember, arrays are zero indexed, so to access this individual entry, we can go down here in order to filter the response body. We’ll begin by tying in $, which is the root node, and then we’ll use a JSONPath expression to drill into the data we want to access. We’ll type “.” and then in square bracket’s well type [0]. This will give us the first response from this array.
Notice that it has the id of 225. If you wanted just the URL from this object, you could type in . and then url. After hitting enter you’ll get your data back.
Or what if you wanted to get a certain value from each entry back? Remember, in our URL we’re limiting our response to 10 items. Now what if we wanted to grab the name of all 10 of these items? To do that, all we’d need to do is type in $. And then place an asterisk between two square brackets [*]. The asterisk is a wildcard. Essentially, we’re requesting to get all entries. Then within each entry, we need to drill in and grab the name. We can do that by adding .name.
Now, notice that all 10 names show up in the response. If we needed more names, we could simply change the search filter in the URL to include, for example… 30 results. Now, if we applied the same filter to the body response, we’d get back the names of all 30 results in the list.
Advanced Filtering
We can also filter responses in more interesting ways as well. For example, if you were looking for data over or under certain numerical values you could use an expression such as
$.results[?(@.id > 500)]
Here, I’m drilling into my results array. Then within square brackets, I’ve included a question mark and then within bracket’s I’ve applied my filter. In this case, I’ve used a @ sign which represents the current array item or object being processed. . Then I’ve targeted each item’s id and tell the expression to only return results where the item has an id greater than 500.
Or notice that within each result, there is a “type”. The type could be government, commercial or private. Imagine we only wanted to return results if they were private launches. We could use this JSONPath expression
$.results[?(@.type == “Private”)]
Notice now that we’re filtering out all results unless they have their “type” set to “private”.
POST Data Through an API
So far, we’ve just been playing around with the GET option, which is the R or (read) operation in CRUD. Let’s now play around with the POST method which is used to implement the C (or create) operation in CRUD.
Over in my bubble application, I’ve set up a database. Called “insomnia testing” and I have a field for name and age in this database. I’ve exposed this API endpoint, so I’m going to paste it within Insomnia.
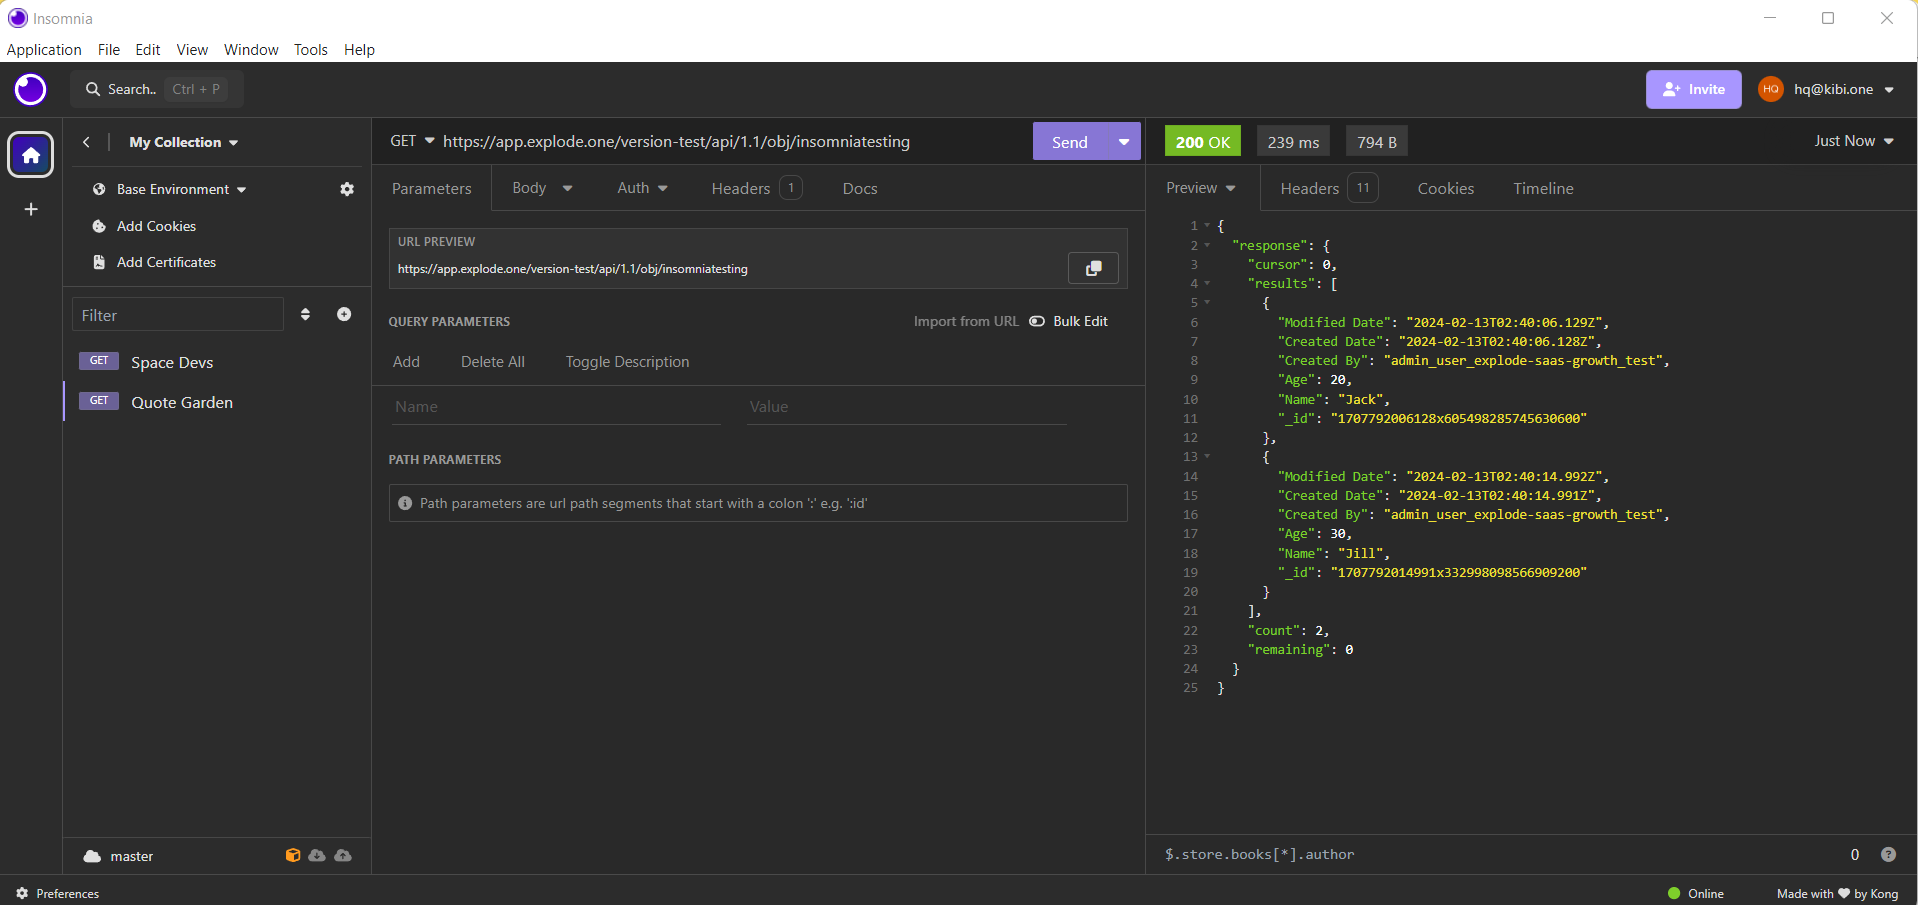
Notice, I have two entries in this database being exposed through this API. 20 year old Jack and 30 year old Jill. However, imagine that I didn’t just want to view this data, but instead, I wanted to add to it. In order to do that I could switch from GET to POST.
In order to do this, I’ll need to first authenticate my user. Therefore, under auth, I’ll select API key and I’ll type in my API key credentials there. I’ll type in “authorization”, and then I need to type in “bearer” space and then I’ll post my API key just after that.
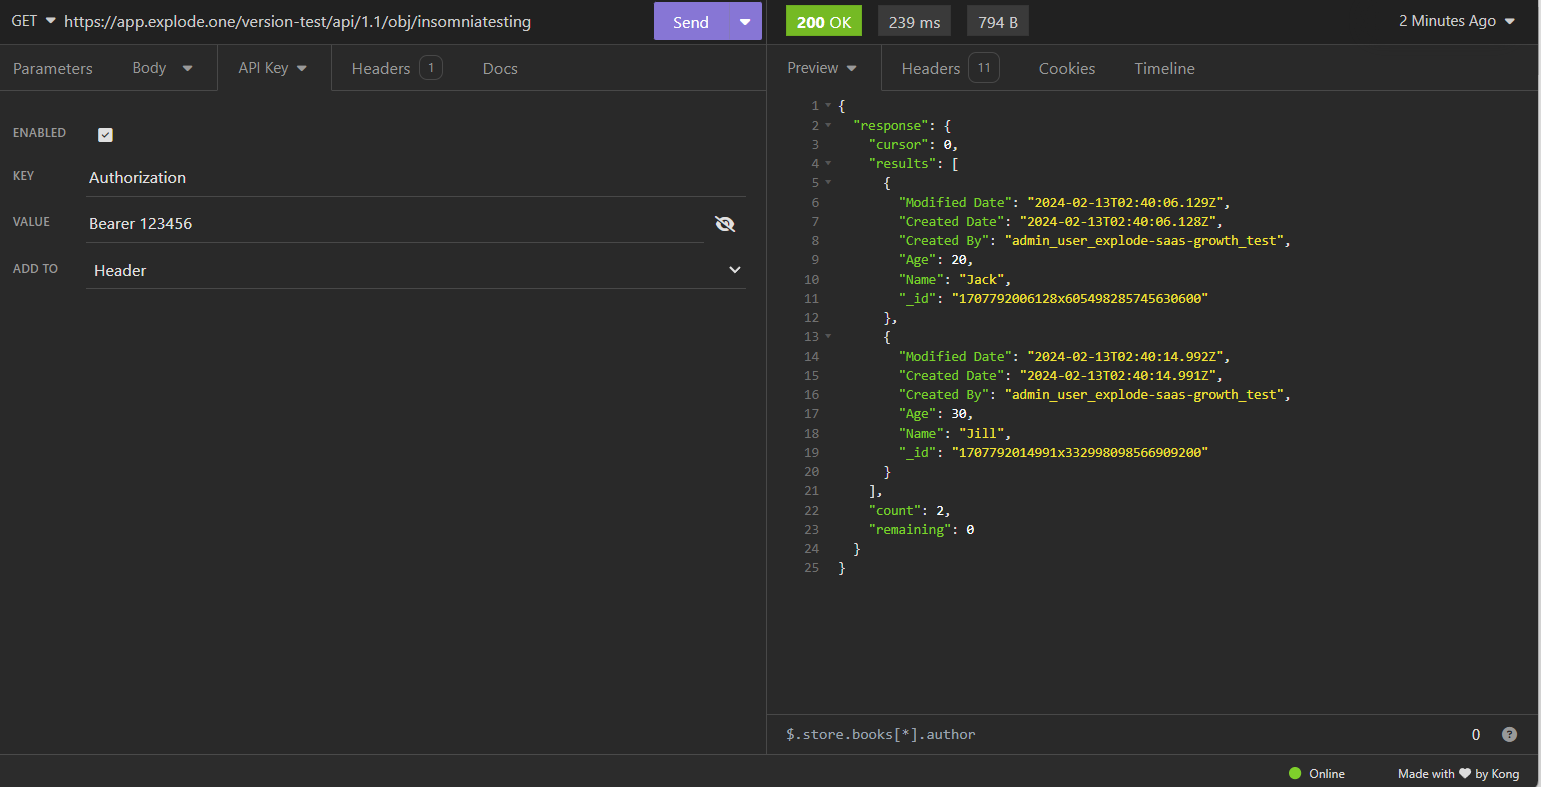
So I’ll do that now and then authenticate myself. Now, notice, when I click on ‘send”, the API call was successful and injected new data into my database. I didn’t specify the data that I wanted to send, so it just sent an empty entry, but it sent an entry nonetheless. So now, let’s add actual data to the database through this insomnia POST API endpoint.
Under “body”, click the drop down and select “multipart form” Now we can simply enter the key value pairs here. So I’ll select Name: John. I’ll then click on “add” and type “age” equals 40. Notice that the keys from these key value pairs match the keys in my database. So now, I can run this again.
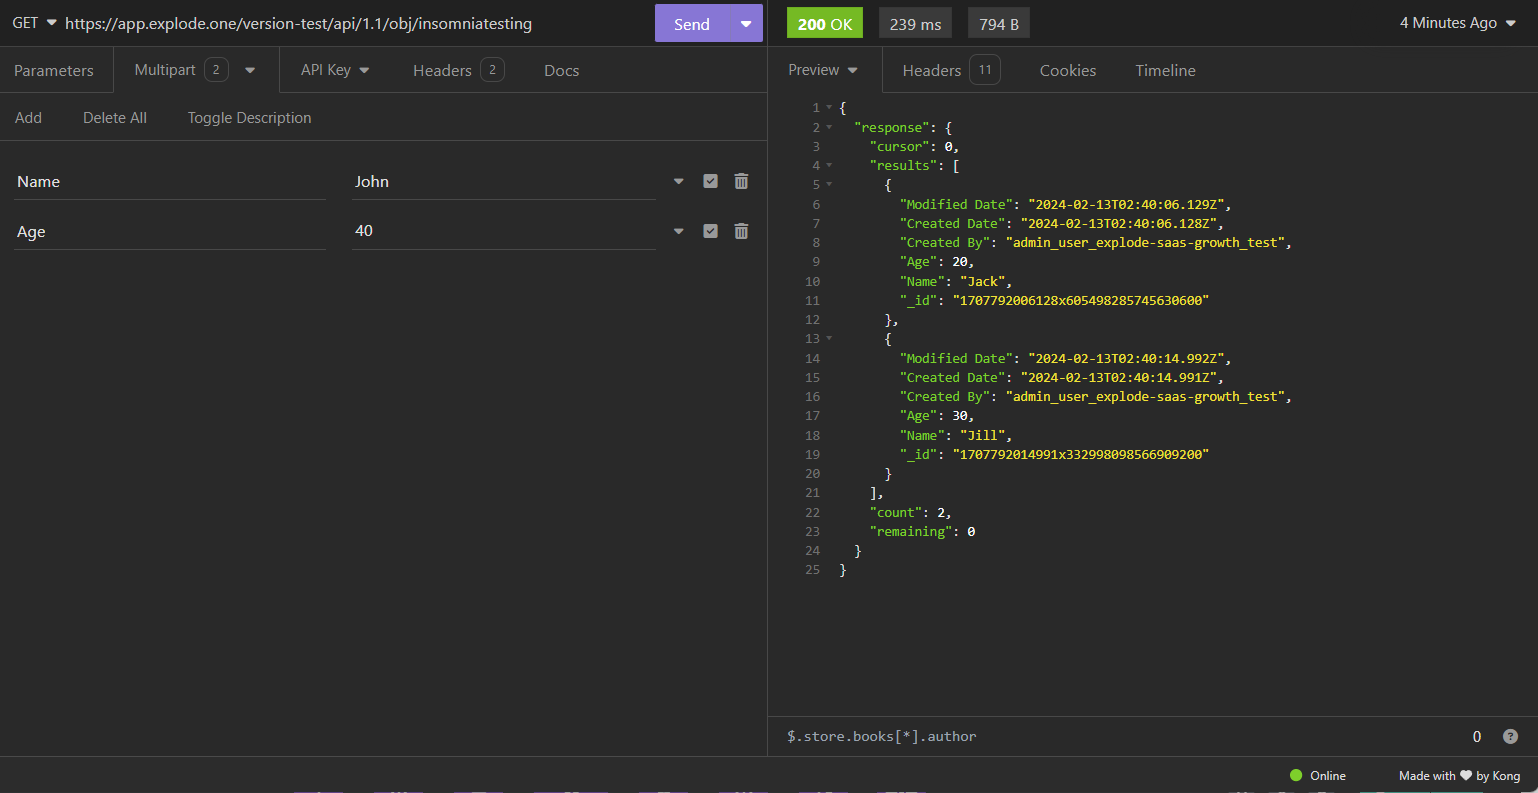
Now, rather than having an empty entry, I’ve allowed Insomnia to inject real data into my database.
Conclusion
So that’s all I have for you today. I hope you’ve found this Insomnia beginners tutorial and getting started guide helpful
And remember, if you’re looking to upskill in the area of SaaS development, I encourage you to check us out over on Kibi.one. We have a no-code SaaS development course where we will teach you how to build and monetize pretty much whatever you can dream up.
Kibi.One is a no-code SaaS incubation program focused on helping non-technical founders build software companies. Visit our homepage to learn more about our program.
Build SaaS Platforms Without Code
Kibi.One is a platform development incubator that helps non-technical founders and entrepreneurs build software companies without having to know how to code.
We're so sure of our program, that if it's doesn't generate a positive ROI for you, we'll buy your platform from you.